


Combat Fundamentals
Schlachtberichte lesen,formationsfehler diagnostizieren und das Upgrade testen, das das Ergebnis tatsächlich verändern wird.
Ignore the headline power number for a moment. Check the troop-type matchup, formation bonus, first hero to die, survival time of the main attacker and whether the battle ended through defeat or timeout. Change one variable, repeat the same fight and compare the reports.
Power is a summary, not an explanation
Squad power combines many sources of development, but it cannot tell you whether those upgrades are on the correct hero, whether your troop type is countered, or whether your damage dealer survives long enough to use an important skill. A lower-power formation can win when its roles, counters, positioning and investment fit the matchup better.
Use five questions after every difficult battle:
- Was the squad composition appropriate for this mode and opponent?
- Did troop counters or a lost lineup bonus create a disadvantage?
- Which hero died first, and at what point in the fight?
- Did the main attacker lack survival time or damage?
- What single change can be tested without changing everything else?
Build the formation around jobs
Official Last War guidance recommends Defence heroes in the two front positions, with Attack and Support heroes in the three back positions. The frontline creates time; the back row converts that time into damage, control, healing or team buffs.
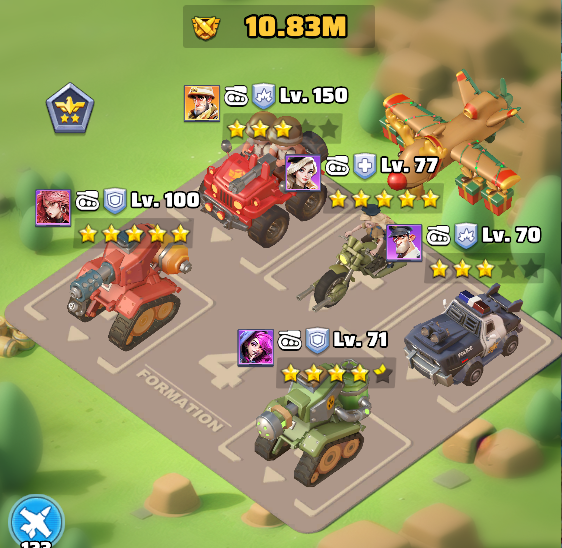
| Hero job | Successful behaviour | Failure signal |
|---|---|---|
| Frontlinienverteidiger | Absorbs opening pressure and survives long enough for the back row to cycle skills. | Dies immediately or allows the protected lane to collapse first. |
| Hauptangreifer | Survives and contributes the largest reliable damage share. | Dies before a major skill or remains alive while team damage is too low. |
| Unterstützung | Improves total survival or damage through repeatable team effects. | Occupies a slot without changing the result compared with another developed hero. |
Do not assume a Support hero is weak because its personal damage is low. Judge the damage, protection or healing enabled across all five heroes. Likewise, a defender absorbing most damage is often performing correctly even if its own damage contribution is small.
Apply counters and lineup bonuses
The official counter cycle is Tank beats Missile, Missile beats Aircraft, and Aircraft beats Tank. The official chart describes the counter as the disadvantaged troop type receiving 20% additional damage from its counter.
Matching troop types also provide HP, Attack and Defence bonuses: three matching heroes grant +5%, four grant +15%, and five grant +20%. That makes a 3+2 formation mechanically different from a full five-type formation, even when the displayed hero power looks similar.
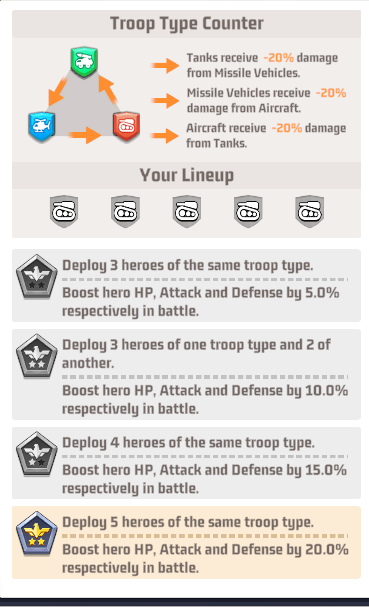
Your five-Tank formation receives a 20% matching bonus but faces Aircraft, its counter. Replacing two developed Tanks with unfinished Missile heroes drops the lineup bonus to 5%. Test the swap; do not assume the counter label automatically repays lost stars, skills, gear and 15 percentage points of lineup bonus.
Read the battle in the correct order
Start with the result and work backwards. Do not jump straight to the hero with the smallest damage number.
| What happened | Likely constraint | First test |
|---|---|---|
| Frontline collapses immediately | Defender development, incorrect roles, bad lane or a major counter disadvantage. | Swap the two defenders and repeat before spending. |
| One back-row hero dies first | The defender in front of that lane is failing, or the enemy skill targets that row or lane. | Move the back-row hero or strengthen the protecting defender. |
| Main attacker dies before its major skill | Not enough survival time. | Improve the frontline or early shielding rather than adding more attack. |
| Everyone survives but the battle times out | Damage, skill levels, offensive gear or relevant research. | Upgrade or reposition the primary damage source. |
| Power increased but result did not | The upgrade affects the wrong hero, stat, troop type or combat mode. | Compare the exact upgraded contribution in the before-and-after reports. |
Totals need a timeline
A battle report total tells you how much happened, not when it happened. Timing changes the interpretation:
- A defender taking the most damage and dying near the end may be doing its job.
- A defender dying in the opening seconds may never activate its strongest protection.
- An attacker dealing low damage because it died early has a survival problem before it has a damage problem.
- An attacker surviving the full fight with low damage may need skill, stars, gun, chip or offensive research.
- A support hero’s value may appear in team survival, buffs or enemy disruption rather than its damage column.
Watch the replay at normal speed once, then again specifically for the first death and major skill activations. Record the approximate time of the first collapse. That single detail often tells you more than the final power comparison.
Match gear to the visible problem
Each hero has four primary gear slots. Community references and the official squad guide align on the broad role split: gun and Data Chip favour main attackers, while armour and radar are the normal frontline priorities. The exact best promotion depends on hero damage type, opponent and current gear milestones.
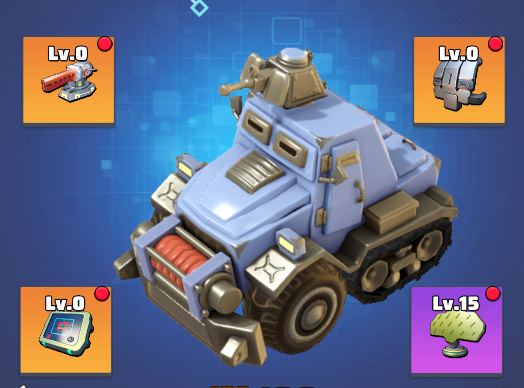
| Gang | Broad role | Prioritise when |
|---|---|---|
| Gun | Offensive output. | The main attacker survives but cannot deliver enough damage. |
| Data Chip | Offensive and skill-oriented value. | The primary damage hero is the clear squad carry. |
| Armour | Frontline durability, commonly associated with physical protection. | A defender is falling to the opponent’s physical pressure. |
| Radar | Frontline durability, commonly associated with energy protection. | A defender is falling to energy-heavy skills. |
Read the enemy hero skill descriptions and the live gear details before applying the physical-versus-energy distinction. Hero kits and exclusive weapons can target different rows, multiple units or special conditions. A universal gear order cannot capture every matchup.
Separate squad strength from battle context
The same five heroes can produce different results because the surrounding systems change. Before comparing two reports, check:
- Hero levels, stars, skills and exclusive-weapon milestones.
- Gear placement—not only gear level.
- Drone level, components and selected chip preset.
- Tank, Aircraft or Missile Center progress and relevant research.
- Alliance technology, decorations, HQ skins, titles and temporary buffs.
- Troop quantity and troop tier, especially across repeated battles.
- Whether the mode applies special rules, restoration or battlefield bonuses.
Official drone guidance confirms that the drone attacks automatically without being targeted and also grants hero statistics. It is therefore part of the combat system, not a decorative power source. Compare the same drone preset when testing formation changes.
Boss, campaign and PvP are different tests
| Mode | What commonly matters | Misleading conclusion |
|---|---|---|
| Boss / damage target | Sustained output, damage buffs and surviving until the timer ends. | Assuming the highest boss-damage squad is automatically best for PvP. |
| Campaign / PvE stage | Survival through scripted enemies, target patterns and stage-specific thresholds. | Assuming one failed stage proves the whole formation is weak. |
| Arena / PvP | Counters, lanes, burst timing, control, enemy gear and formation bonus. | Copying a result from one opponent to every matchup. |
| Battlefield | Squad combat plus troops, healing, objectives, movement and repeated engagements. | Judging success only by individual battle wins instead of the event objective. |
Create separate presets where the game permits it. A formation optimised for a stationary monster can sacrifice control or frontline tools that are decisive against another commander.
Run a controlled combat test
- Choose a repeatable target. Use the same opponent or PvE stage.
- Save the baseline. Capture formation, power, gear positions, drone preset and report.
- Change one variable. Swap defender lanes, move one gear item or raise one planned skill.
- Repeat several times. Critical hits, targeting and timing can create one lucky result.
- Compare the right measurement. First-death time, attacker survival, total damage or troops remaining.
- Keep or reverse the change. Do not leave an unproven setup in place merely because its power is higher.
A useful test changes one thing and measures one result. Changing heroes, lanes, gear and drone together may produce a win, but it does not teach you why.
A five-minute loss diagnosis
- Confirm the troop counter and matching lineup bonus.
- Confirm two Defence heroes are in front and the main attacker is protected.
- Watch the first death and note the time.
- Read damage dealt, damage taken and support contribution.
- Check whether the defeat was a collapse, timeout or repeated-battle attrition.
- Select the smallest test that addresses that exact failure.
Common combat-reading mistakes
- Chasing displayed power: power on a bench hero or irrelevant stat does not win the active matchup.
- Blaming the lowest damage hero: Defence and Support heroes have different jobs.
- Changing the whole formation: the result changes, but the cause remains unknown.
- Testing different opponents: counter, gear and targeting differences invalidate the comparison.
- Ignoring troop depletion: later fights in a chain may use a weakened march.
- Copying a top player exactly: their stars, exclusive weapons and research may make the same formation behave differently.
- Using one mode as universal proof: bosses, Arena and battlefields reward different qualities.
Continue your War Room training
- Aufstellungen & Positionierung — lanes, counters and formation bonuses.
- Fahrzeugzähler — decide when a counter swap is genuinely worthwhile.
- Mythisches Ausrüstungteil — choose scarce blueprint targets from battle evidence.
- Hero Roles, Skills & Star Progression — invest in the heroes performing each battlefield job.
Referenzen und Nachweise
- Official Last War Support — How to Build the Best Squad (roles, positions, counters, lineup bonuses and concentrated development).
- Official Last War Support — Drone Development (automatic drone attacks, hero bonuses and presets; updated 30 March 2026).
- Official Last War Support — T11 unit usage (repeated-battle attrition and sustained combat).
- Last War Tutorial — Gears (community role and equipment reference).
- Last War Tutorial — Heroes (community role and damage-type cross-check).
Last evidence review: 25 July 2026. Live hero skills, gear descriptions and mode rules are the final authority after balance changes.
Diese Missionsakte aufzeichnen
Ihre Vervollständigung wird privat in diesem Browser gespeichert. Melden Sie sich als Mitglied an, um sie zwischen Geräten zu synchronisieren.
War dieser Leitfaden hilfreich?
Ihr Feedback hilft uns, das nächste Update zu verbessern.