


How to Read a Battle Report
Nutzen Sie einen echten Kriegsbericht, um Truppenverluste, Heldentaten, Frontversagen und die nächste zu testende Änderung zu identifizieren.
Read the report from top to bottom: battle outcome, troop condition, hero damage, skill drill-down and drone contribution. Then combine those totals with the replay. The lowest damage number is not automatically the problem, and the highest power number does not explain the result.
A real report, opened in the correct order
A complete report is not one screen. Work through Heroes, Army and power sources, then Battle Statistics. Every English screen below comes from the same battle, so the comparisons and worked diagnosis remain consistent from beginning to end.
Heroes: formation, gear and skills
First confirm exactly who fought, where they were placed and how developed they were.
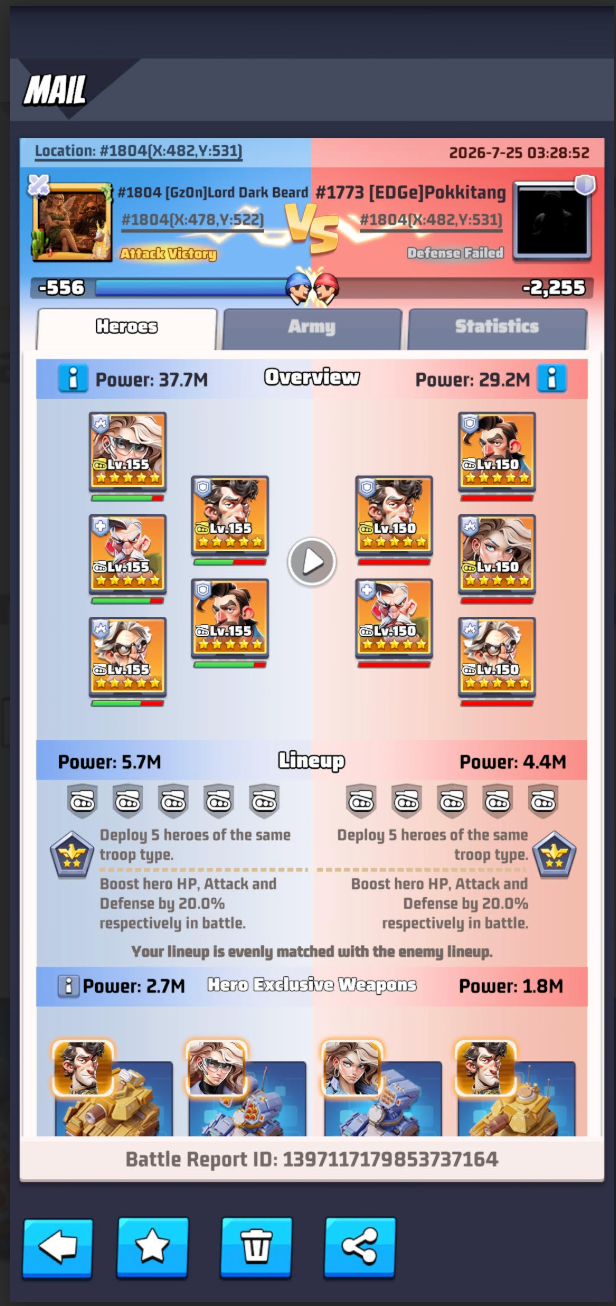
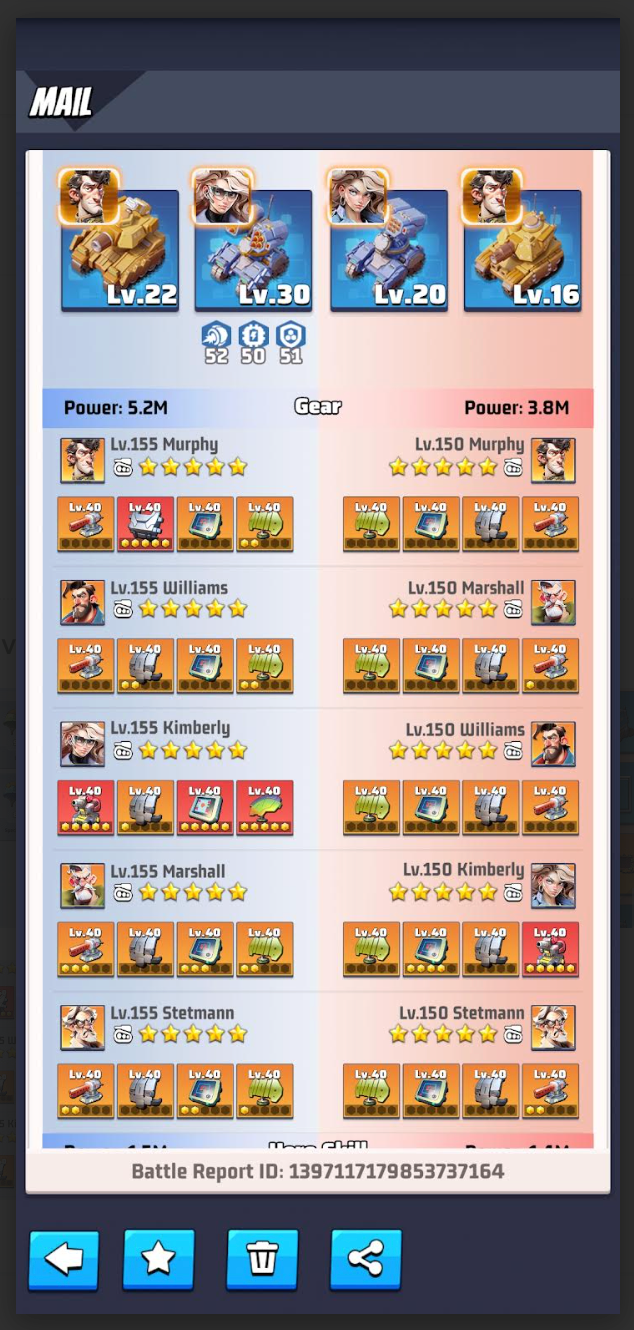
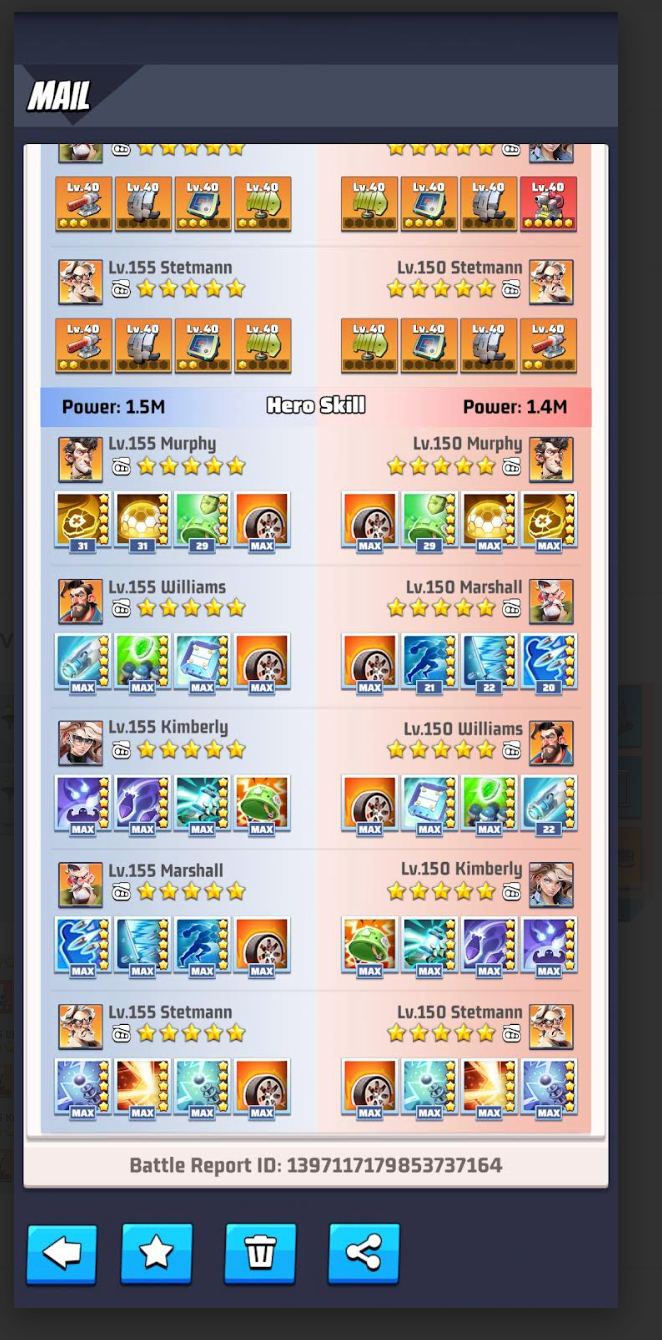
Confirm the front and back rows, hero level, stars, rarity and troop type. A lane mismatch can matter more than a small power gap.
Compare the same four slots hero by hero. Look for level, promotion dots and mythic progression rather than judging total squad power alone.
Scroll through every skill row and check exclusive-weapon milestones. Two identical portraits can perform very differently.
Army, drone and permanent power
Now separate the troop foundation from the extra systems strengthening the formation.
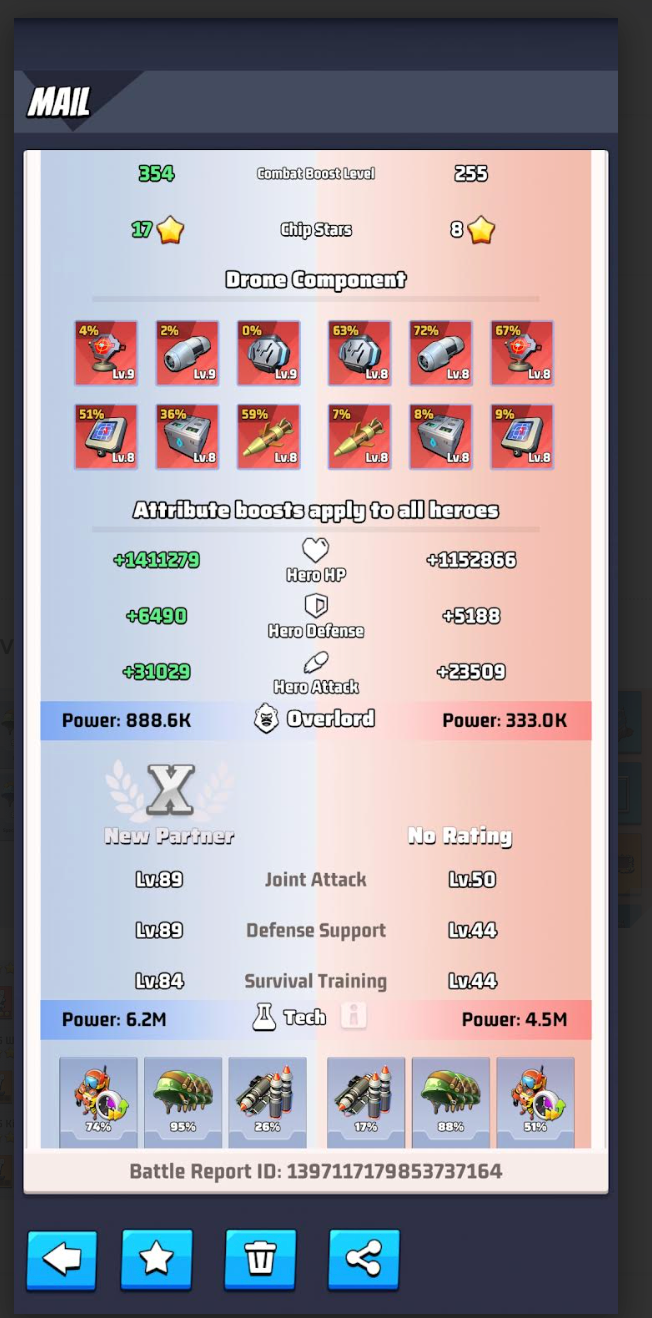
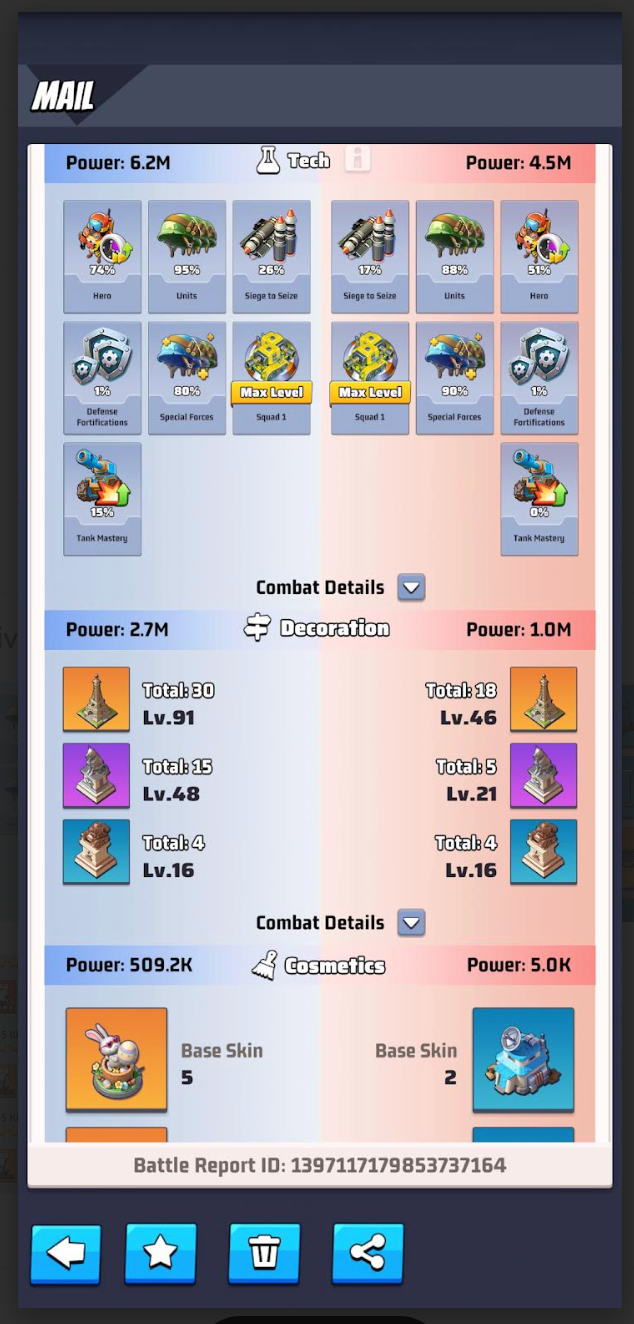
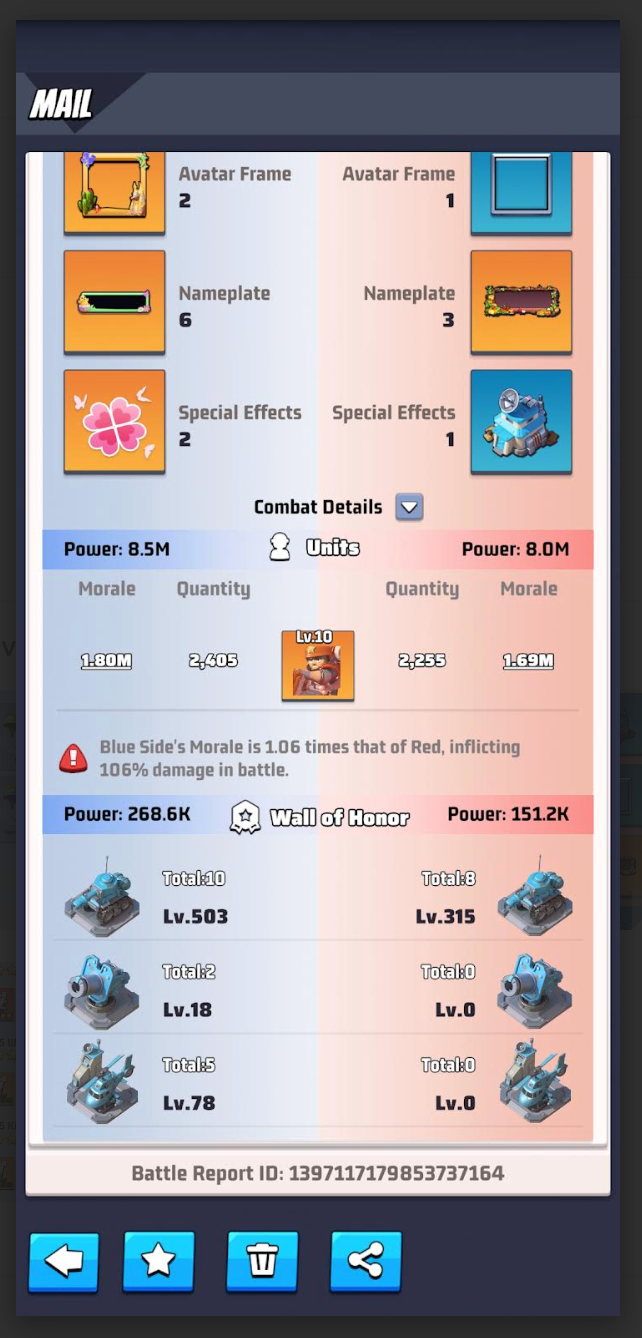
In the Army tab compare troop tier, quantity, morale, Attack, Defence and HP. If this base is weaker, do not blame the hero cards first.
Drone level, components and skill chips add power and battle effects. Keep the same preset when testing a hero change or the comparison is contaminated.
This permanent hero investment appears inside Hero Power. It can explain why apparently similar levels and stars still produce different real strength.
Battle Statistics: what happened
Only after checking the inputs should you diagnose casualties, hero damage, skill detail and drone contribution.
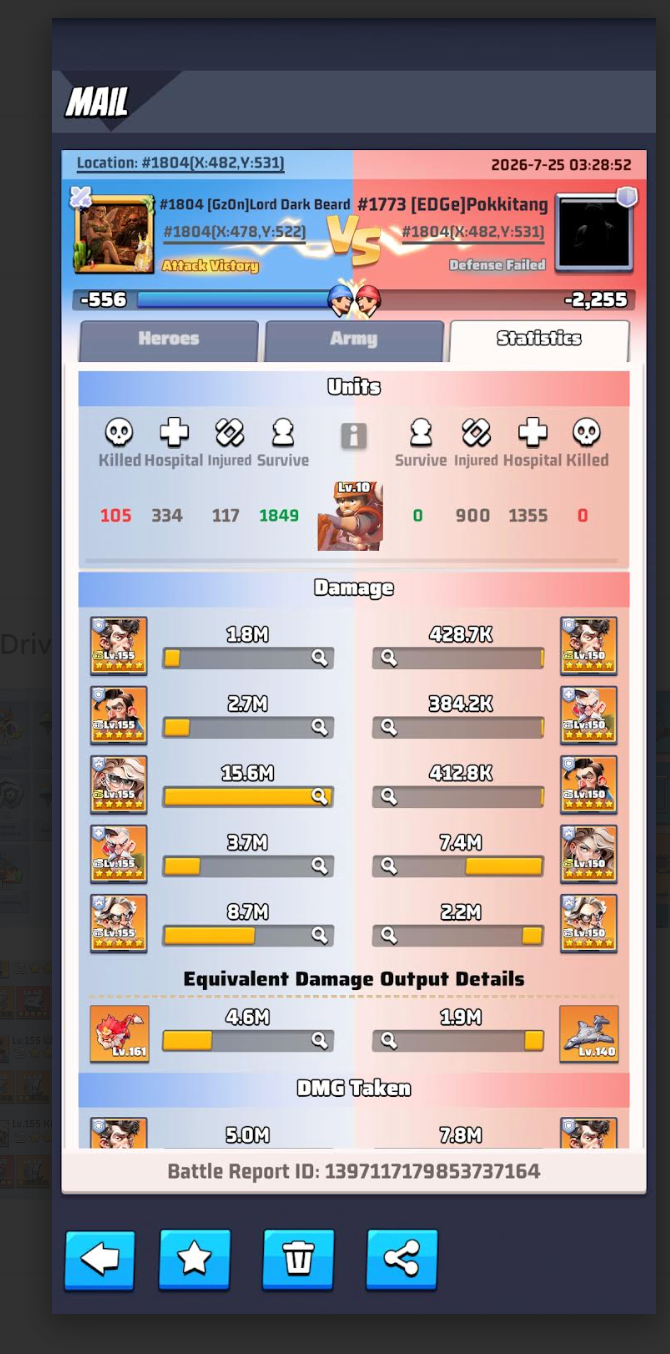
Read killed, hospitalised, lightly wounded and surviving troops for both sides before looking for a cause.
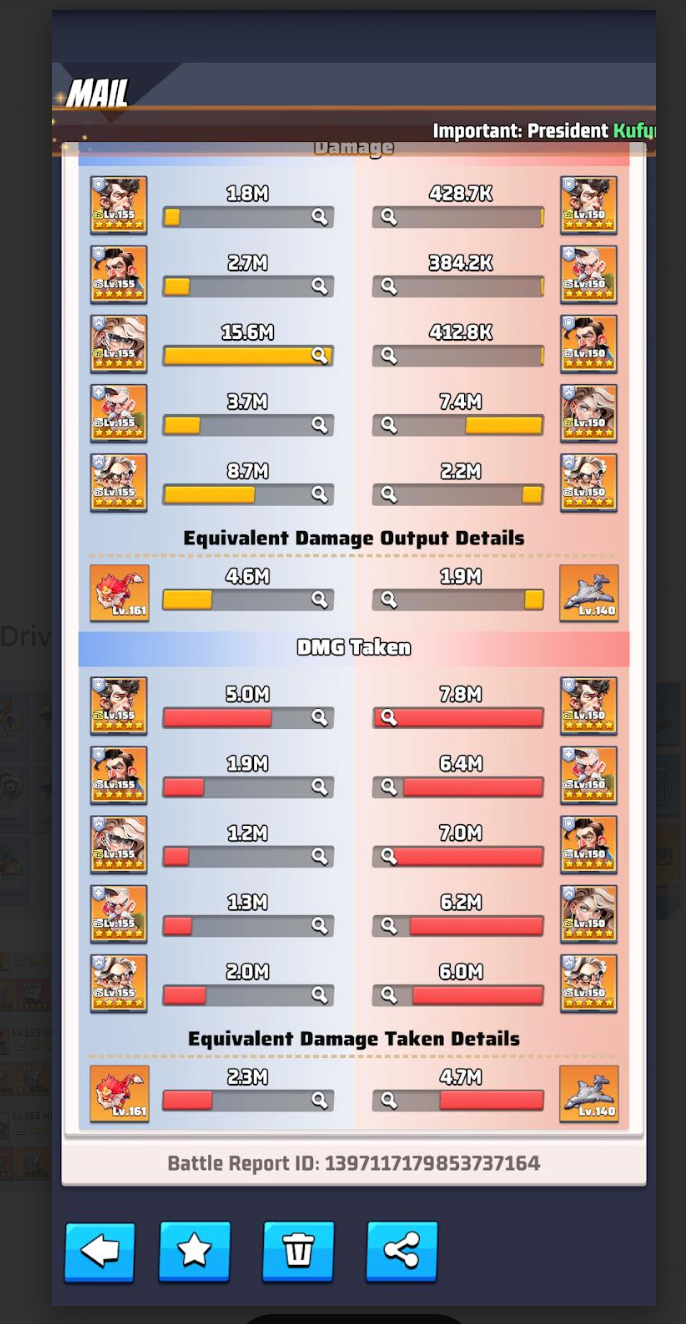
Compare each damage total with that hero’s battlefield job and survival time. The smallest bar is not automatically the failure.
Open the magnifying glass beside a hero to see which skills actually contributed. The total bar cannot show timing or missed casts.
Break down the Battle Statistics screen
The blue side won this example and retained 1,849 troops, while the red side had none remaining. The numbered key now matches the English labels visible in the report.
1
2
3
4
5
6
- 1Troop outcomeKilled, hospitalised, lightly wounded and surviving troops for both sides.
- 2Hero damageDamage attributed to each hero. Compare heroes by battlefield job, not by identical expectations.
- 3Hero portraitsConfirm the exact formation, troop type, rarity, level and star development before judging the bars.
- 4Damage barsA fast visual comparison of each hero’s contribution within this one fight.
- 5Magnifying glassOpen it to inspect the hero’s skill-by-skill damage instead of relying on the total alone.
- 6Drone damageThe drone has its own contribution. Do not accidentally credit this damage to a hero.
1. Start with the troop outcome
The four icons at the top represent troops killed, sent to hospital, lightly wounded and surviving. In this example:
| Side | Killed | Hospital | Lightly wounded | Survived |
|---|---|---|---|---|
| Left / blue | 105 | 334 | 117 | 1,849 |
| Right / red | 0 | 1,355 | 900 | 0 |
This immediately tells us that the left squad won decisively enough to retain a substantial force. It does not yet tell us why. Troop tier, morale, formation, heroes, gear, drone, research and temporary bonuses can all contribute.
“Lightly wounded,” “hospitalised” and “killed” are different outcomes. Do not describe every missing troop as permanently lost. The mode and its rules determine where casualties go.
2. Confirm what each hero was supposed to do
Before comparing numbers, identify the five battlefield jobs. Defence heroes normally create time in the front row. Attack heroes convert that time into damage. Support heroes may raise team Attack, reduce incoming damage, heal, shield or disrupt the enemy.
| Rolle | Report question | Do not assume |
|---|---|---|
| Verteidigung | Did the hero absorb pressure and remain alive long enough for the back row to cycle skills? | Low personal damage means the defender failed. |
| Angriff | Did the hero survive long enough to use its important tactics skill, and did that skill hit useful targets? | The highest final total always means correct positioning. |
| Unterstützung | Did the team benefit from its buff, healing, protection or control effect? | Its value must appear in its own damage bar. |
The portraits also reveal troop type. Apply the counter cycle before diagnosing investment: Tank beats Missile, Missile beats Aircraft, Aircraft beats Tank. A counter disadvantage can change both survival time and damage output.
3. Read damage dealt without blaming the smallest bar
On blue, the five heroes dealt approximately 1.8M, 2.7M, 15.6M, 3.7M and 8.7M. Kimberly and Stetmann produced most of blue’s hero damage, which is healthy for the formation’s main damage dealers. On red, Kimberly led at 7.4M, but the other four heroes combined for only about 3.43M.
Use these three comparisons:
- Compare the hero with its job. A defender and a damage dealer should not produce identical totals.
- Compare the same hero across repeated fights. This is more useful than comparing unrelated heroes in one report.
- Compare damage with survival time. A low total caused by an early death requires a survival fix before an Attack upgrade.
Damage dealt answers “how much?” The replay and skill drill-down answer “when, how and against whom?” You need both before spending.
4. Open the magnifying glass
Each magnifying-glass button opens that hero’s detailed damage information. Use it to separate the auto attack, tactics skill, exclusive-weapon effects and other recorded contributions where the live report exposes them.
The drill-down answers questions the total bar cannot:
- Did the hero activate its tactics skill at all?
- Did it complete one cycle or several?
- Did most damage come from the expected skill?
- Did an exclusive-weapon effect materially change the result?
- Was the hero alive but contributing very little?
If the main attacker died just before a major cast, improving the protecting defender, changing lanes or adding survival may produce more damage than upgrading the attacker’s gun.
5. Add damage taken and healing
Scroll further when the report includes damage-taken and healing sections. Interpret them as evidence of role performance:
| Pattern | Likely meaning | First investigation |
|---|---|---|
| Front defender takes the most damage and survives late | It is probably doing its job. | Check whether the back row had enough time to convert that protection into damage. |
| Front defender takes little damage and dies first | It may have been deleted before meaningful mitigation or healing occurred. | Check level, stars, defensive gear, lane and enemy damage type. |
| Back-row attacker takes heavy damage early | The enemy may target the back row, or the protecting lane collapsed. | Watch the replay and identify the exact skill and first death. |
| Support healing is low | The support may have died early, failed to cycle or supplied value through another effect. | Read its skills and activation timing before replacing it. |
6. Keep drone damage separate
The Equivalent Damage Output row records the separate drone contribution: approximately 4.6M for blue and 1.9M for red in this example. The Army screen helps explain that gap: blue has the higher Combat Boost level, more chip stars and stronger component-derived hero attributes.
When testing a hero or gear change, keep the same drone preset. Otherwise the before-and-after report contains two changed variables and cannot prove which one caused the result.
7. Use the replay to add the missing timeline
The statistics screen has totals, not a complete timeline. Watch the replay and record:
- The first hero to die and the approximate time.
- The lane that collapsed first.
- Whether the main attacker used its important tactics skill before dying.
- Whether control effects interrupted a cast.
- Whether the battle ended through elimination or timeout.
A defender taking 30M damage over a long fight is different from a defender disappearing in the opening burst. An attacker dealing 8M before dying at five seconds may not need more Attack—it may need enough protection to reach the next cast.
Worked diagnosis: what this example really says
From the visible report we can safely conclude:
- Blue won and retained 1,849 troops; red had no survivors.
- Both sides received the same five-Tank 20% lineup bonus, so the result was not caused by one side missing its formation bonus.
- Blue began with more units and 1.06 times red’s morale, which the report states produced 106% battle damage.
- Blue Kimberly and Stetmann were its main hero damage sources at 15.6M and 8.7M.
- Blue’s equivalent damage contribution also led 4.6M to 1.9M, supported by a clear drone-development advantage.
We cannot safely conclude from this screen alone that one gear item, hero or skill caused the victory. A responsible diagnosis would next open the skill details, compare damage taken, check troop types and watch the first death in the replay.
A strong guide separates what the report proves from what it merely suggests. “Their damage was lower” is proven here. “Their gun was too weak” is only a hypothesis until gear, skills, survival time and matchup are checked.
The two-minute report checklist
- Outcome: victory, defeat, timeout and troops remaining.
- Context: troop types, counter, lineup bonus and mode rules.
- First collapse: which hero and which lane failed first?
- Damage: did the main attackers survive and perform their jobs?
- Protection: did defenders absorb useful pressure or vanish early?
- Support: judge buffs, healing and control—not only personal damage.
- Skills: open the magnifying glass and check important activations.
- Drone: keep its damage and preset separate from hero changes.
- Test: change one variable and repeat the same matchup.
Choose the next action from the failure
| Beweis | Best first test | Avoid |
|---|---|---|
| Main attacker dies before its tactics skill. | Swap defender lanes or improve the relevant frontline protection. | Blindly adding more Attack. |
| Frontline survives but the fight times out. | Improve the primary attacker’s skill, gun, chip or offensive research. | Adding more defence without evidence. |
| One lane collapses much earlier. | Swap the two defenders and repeat against the same opponent. | Changing the whole formation at once. |
| Hero totals look similar but drone damage is far behind. | Compare drone level, components, chips and preset. | Blaming hero stars alone. |
| Every hero underperforms into one troop type. | Check the counter matchup and test a developed alternative formation. | Replacing developed heroes with unfinished counters without testing. |
Continue your War Room training
- Kampfgrundlagen — turn report evidence into controlled upgrades.
- Aufstellungen & Positionierung — understand lanes, roles and protection.
- Fahrzeugzähler — test when a counter swap is actually worthwhile.
- Mythisches Ausrüstungteil — match defensive and offensive gear to the visible constraint.
Referenzen und Nachweise
- GzOn Academy live English battle report, captured 25 July 2026 (Heroes, Army, Statistics, gear, skills, drone, technology, units and Wall of Honor screens).
- Official Last War Support — How to Build the Best Squad (roles, positions, troop counters and lineup bonuses).
- Official Last War Support — Drone Development (drone attacks, hero bonuses and presets).
- Last War Wiki — Understanding Troop Stats (power, morale and troop contributions).
Last evidence review: 25 July 2026. Every reproduced report screen belongs to the same English-language battle. Live game labels, battle rules and skill descriptions override this captured example after balance changes.
Diese Missionsakte aufzeichnen
Ihre Vervollständigung wird privat in diesem Browser gespeichert. Melden Sie sich als Mitglied an, um sie zwischen Geräten zu synchronisieren.
War dieser Leitfaden hilfreich?
Ihr Feedback hilft uns, das nächste Update zu verbessern.